12/30/2015
first experiments with lovë2D pixel shaders
I've been trying to get my youngest brother to start making his own video games instead of spending all of his time playing them. I sat down with him over this winter break to show him how to write some Lua for use with Löve, a 2d game engine.
So the first thing I thought we'd write is an asteriods clone. The code really isn't worth posting, but here's a little screenshot.
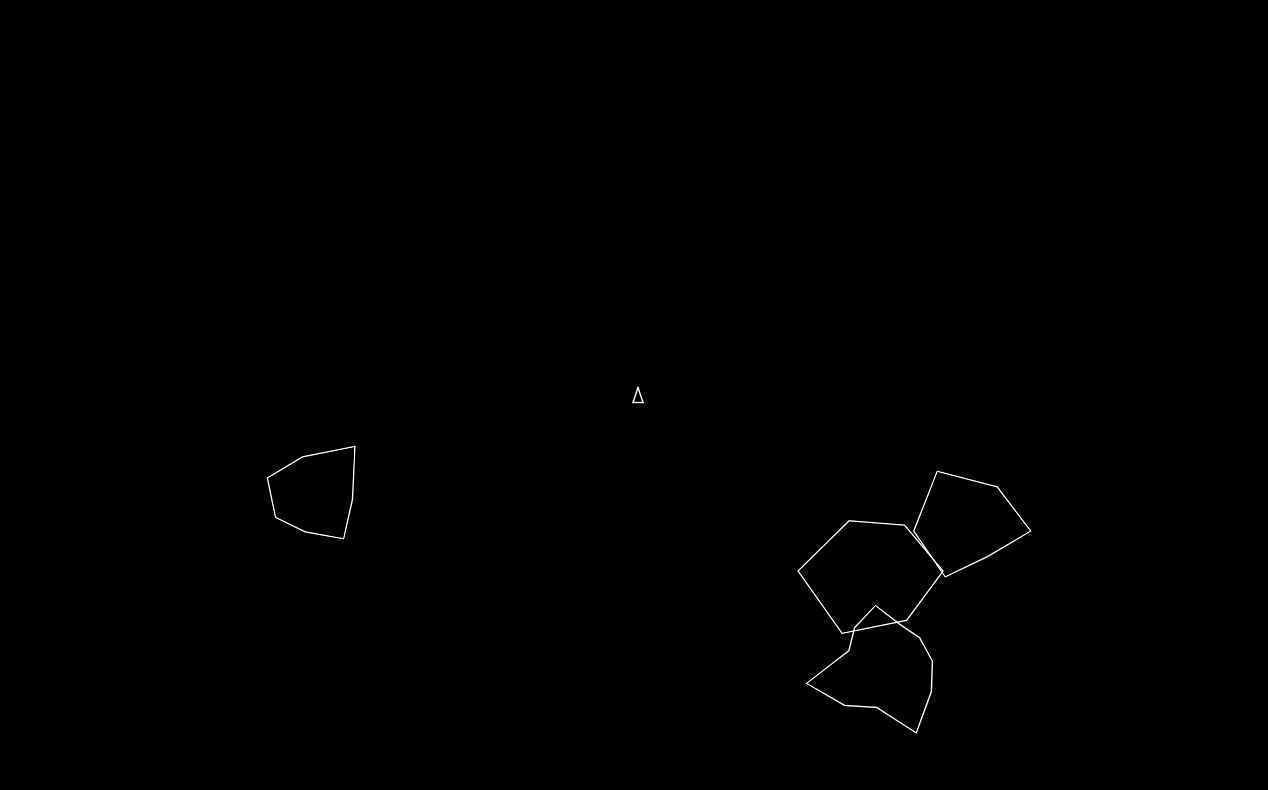
We actually had a lot of fun implementing all of the basic asteriods stuff. The asteriods are randomly generated in size and shape. The ship can be piloted around with the classic controls, and we even added a little red triangle as the rocket that shows up with you're using the thruster.
I wanted to show my brother that the best part about writing your own software and games is being able to make the computer kind of do whatever you want. We started goofing around by making the missiles super long (or are they laser beams?), which gave us some funny effects, and then we found that you could get some cool results by imparting no extra velocity on the missiles. Typically the when you want to shoot a missile from the ship you add some missile velocity to the ship's velocity and that's the initial velocity of the missile. With no missile velocity, if the ship was moving along at constant speed and a missile was shot, then the missile would just continue floating along with the ship.
At this point, I was looking for some cooler stuff to show him, that that's when I stumbled upon Love's new pixel shaders feature. With this, we wrote a quick shader that covers whatever is drawn on the black blackground with a spinning rainbow wheel. Here's the shader code.
extern number screen_width;
extern number screen_height;
extern number time;

#define PI 3.14159

vec4 hsvToRgb(float hue, float saturation, float value, float alpha) {

    float chroma = value * saturation;
    float h = hue / 60.0;
    float x = chroma * (1 - abs(mod(h, 2) - 1));
    vec3 intermediate = vec3(0, 0, 0);
    if (0 <= h && h < 1) {
        intermediate = vec3(chroma, x, 0);
    } else if (1 <= h && h < 2) {
        intermediate = vec3(x, chroma, 0);
    } else if (2 <= h && h < 3) {
        intermediate = vec3(0, chroma, x);
    } else if (3 <= h && h < 4) {
        intermediate = vec3(0, x, chroma);
    } else if (4 <= h && h < 5) {
        intermediate = vec3(x, 0, chroma);
    } else if (5 <= h && h < 6) {
        intermediate = vec3(chroma, 0, x);
    }
    float m = value - chroma;
    return vec4(intermediate[0] + m, intermediate[1] + m, intermediate[2] + m, alpha);
}

vec4 effect(vec4 color, Image texture, vec2 texture_coords, vec2 screen_coords ){
    float x = ((screen_coords.x / screen_width) * 2) - 1;
    float y = ((screen_coords.y / screen_height) * 2) - 1;

    if (color == vec4(1.0, 0, 0, 1.0)) {
        return color;
    }

    if (x != 0 && y != 0) {
        float angle = atan(y, x);
        if (angle < 0) {
            angle += 2 * PI;
        }
        angle = mod((angle * (180 / PI)) + time * 10, 360);
        float dist = sqrt(pow(x, 2) + pow(y, 2)) / sqrt(2);
        float saturation = (((sin(time) / 2) + 0.5) * 0.1) + 0.9;
        return hsvToRgb(angle, dist, 1.0, 1.0);
    } else {
        return vec4(1.0, 1.0, 1.0, sin(time));
    }
}
There's a small function to convert from the HSV space to RGB space. There has to be a better way of doing this but this is the algorithm I've always used (it's in the Wikipedia page for the HSV color space). The actual shader code is calculating the angle from the center of the screen, and then using this to set the hue of the pixel. The distance from the center sets the saturation, and then the whole thing is rotating in time, creating this spiral color wheel effect. If the original pixel was black then it simply returns black. This means that the only pixels that get colored are where things have been drawn. This was really great to get him involved, since normally dealing with OpenGL mainly involves mucking about with a library, or writing a few hundred lines of boilerplate code to compile the shaders and setup framebuffers and whatnot.
Here's the result of the weird missiles and the shader.
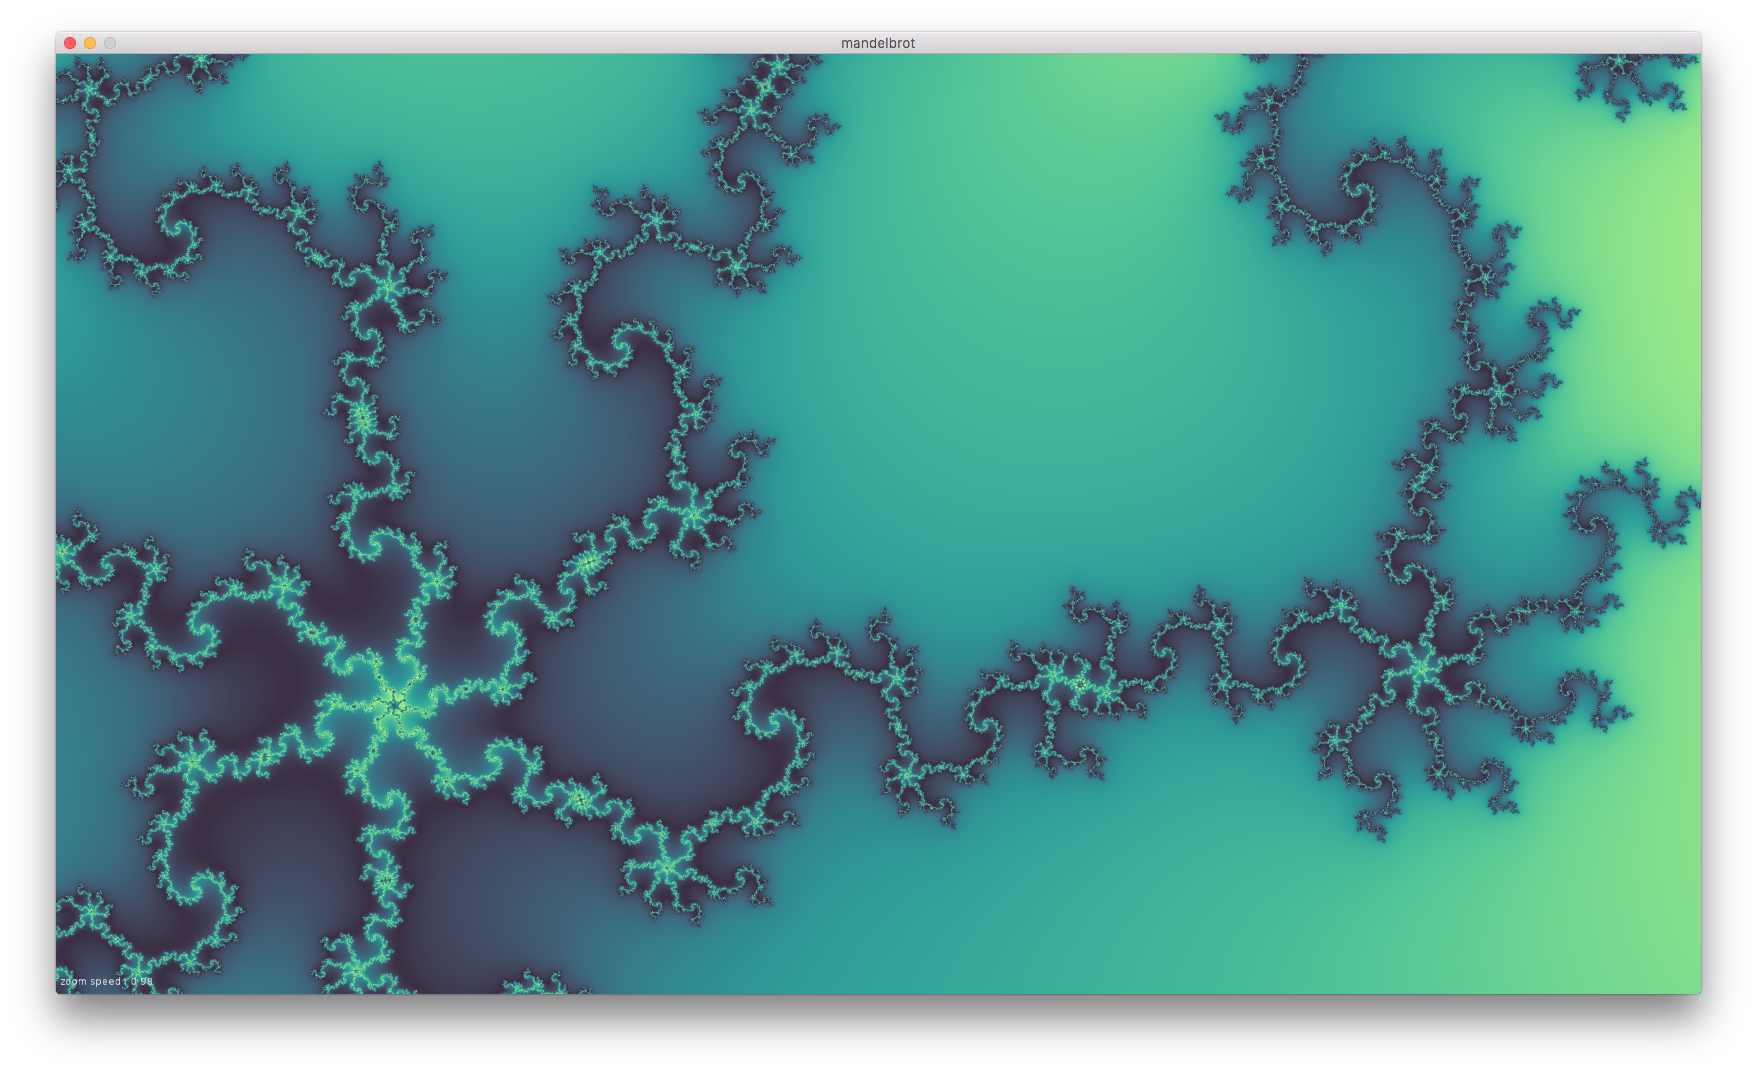
What's really neat is that the shader only acts wherever you have drawn objects on the screen. If you just want to see what the output of the shader is, a bounds-sized rectangle can be drawn, and all operations can be done in the shader. However, this allows for "masking" of the shader. So here's a mandlebrot shader acting on two moving circles. In this case, the mandlebrot shader uses the screenCords that's passed to the pixel shader.
A friend challenged me to make the mandlebrots inside individual circles that are moving independently of one another. For this the textureCoords shader variable can be used. In this case, you have to draw a texture. I used a 1x1 pixel image, and then limited limited the drawing in the shader to a circular shape by first testing the distance from the center of the texture before coloring any pixels. What's neat is that the texture rotation is taken into account (not 100% sure how), so if you draw the texture rotated using the love.graphics.draw method, whatever the shader does is inherently rotated. The code for this demonstration is below the video, if you're interested with playing with it.
extern number screen_width;
extern number screen_height;

vec4 effect(vec4 color, Image texture, vec2 texture_coords, vec2 screen_coords) {
  if(sqrt(pow(texture_coords.x * 2.0 - 1.0, 2) + pow(texture_coords.y * 2.0 - 1.0, 2)) > 1) {
    return vec4(0.0, 0.0, 0.0, 0.0);
  }

  float x0 = (texture_coords.x * 3.35) - 2.5;
  float y0 = (texture_coords.y * 2) - 1;

  float x = 0.0;
  float y = 0.0;
  int iteration = 0;
  int max_iterations = 100;

  while((pow(x, 2) + pow(y, 2) < 256) && iteration < max_iterations) {
    float xtemp = pow(x, 2) - pow(y, 2) + x0;
    y = 2 * x * y + y0;
    x = xtemp;
    iteration += 1;
  }

  if (iteration < 950) {
    return vec4(1.0, iteration / 30.0, iteration / 10.0, 1.0);
  } else {
    return vec4(0.0, 0.0, 0.0, 1.0);
  }

  return vec4(screen_coords[0] / screen_width, screen_coords[1] / screen_height, 0.2, 1.0);
}
shader = ""
screenWidth = 0
screenHeight = 0
imageWidth = 0
imageHeight = 0
image = ""

function love.load(a)
    shader = love.graphics.newShader("shader.frag")
    screenWidth = love.graphics.getWidth()
    screenHeight = love.graphics.getHeight()
    image = love.graphics.newImage("tex.png")
    imageWidth = image:getWidth()
    imageHeight = image:getHeight()
end

t = 0

function love.update(dt)
    t = t + dt
end

function love.draw(dt)
    love.graphics.setShader(shader)
    local prefs = {
        {3, 4, 8, 1, 0.2},
        {1, 5, 4, 1.2, 0.2},
        {4, 5, 3, 0.8, 0.6},
        {1, 2, 2, 2.1, 0.1},
        {1, 4, 10, 20, 20}
    }
    for i = 1, 5 do
        local pref = prefs[i]
        local x1 = (math.sin(pref[1] * t) * 0.5 + 0.5) * (screenWidth - imageWidth)
        local y1 = (math.cos(pref[2] * t) * 0.5 + 0.5) * (screenHeight - imageHeight)
        local scale1 = ((math.sin(pref[3] * t) * 0.5 + 0.5) * pref[5]) + 1
        love.graphics.draw(image, x1, y1, t * pref[4], 200)
    end
end
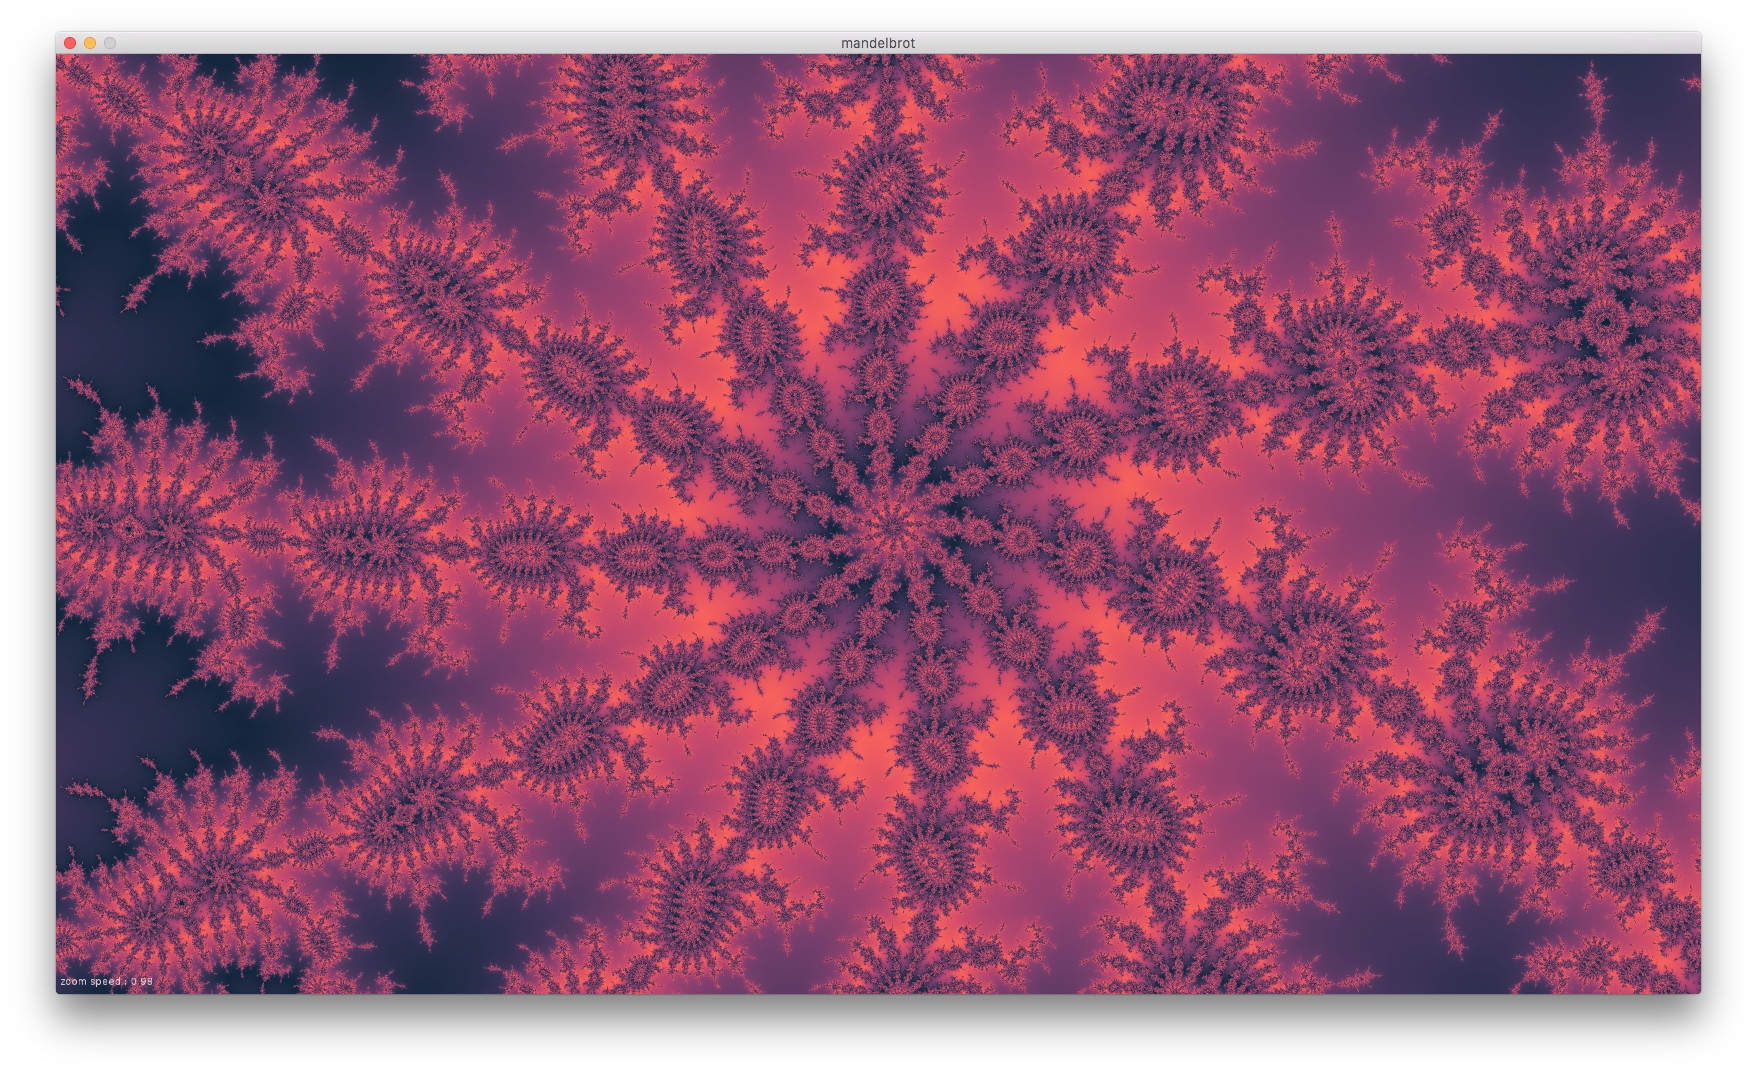
I wanted to try implementing one of the smooth coloring techniques, and I'm not really a master of complex analysis so, I pretty much just implemented the psuedocode in the Wikipedia article listed under the "continuous smooth coloring" section. It utilizes the magnitude of the iteration (which, for points in the plane that you've decided to "bail out", is equal to the bailout radius) and the iteration at which this bailout radius was achieved. This is then used to choose a color out of a nice list of colors.
I generated lists of smoothly varying colors using this HCL picker, which lets you drag a line between two colors on a nice HCL color plot. I clicked the + a bunch of times to generate a few hundred points along the line, and then hit the copy button. This copies the list as hex values. I wrote a small Lua script to convert the hex values to a static array in Lua syntax, that could be easily handed off to the shader.
A strange feature of Löve here is the love.filesystem.load method. Looking into it more it's probably using the Lua dofile builtin. It allowed me to create an almost JSON-like file of data. The colorData.lua file simply defines a global colors list that is accessable in the global scope after the file is executed.
--  load and execute the color data, which creates a "colors" global
local colorData = love.filesystem.load("colorData.lua")
colorData()
I wrote a small user interface that enables the user to change the zoom speed using the scroll wheel, as well as cycle through a few different color pallets. It also allows adjustable oversampling to achieve a configurable amount of anti-aliasing. The fastest rendering occurs when this is disabled. I also added the ability to export the current viewport at a very large size to an image file.
The trickiest part was figuring out how to zoom in or out at the point the mouse was hovering in the complex plane. It ended up being a simple calculation. The first step was to take the mouse coordinates in the window, convert them to a coordinate in the complex plane, shrink the domain, and then do the inverse calculation to ensure the point in the complex plane is still at the same window coordinate after the domain has shrunk. Zooming out is an identical calculation, but the domain becomes larger instead of smaller. The relevant code is below.
if love.mouse.isDown(1, 2) then

    --  find the x and y point in the current fractal domain
    local x = love.mouse.getX()
    local y = love.mouse.getY()
    local range = domain / aspectRatio
    local xClick = xCenter + ((x / windowWidth) * domain) - (domain / 2)
    local yClick = yCenter + ((y / windowHeight) * range) - (range / 2)

    --  are we zooming in or out?
    if love.mouse.isDown(1) then
        domain = domain * zoomSpeed
    elseif love.mouse.isDown(2) then
        domain = domain / zoomSpeed
    end

    --  need to set a new center so that this point stays at the
    --  location of the click, instead of zooming in at the center, this is
    --  essentially the inverse of the previous calculation, just using
    --  the new domain after zooming in or out
    local range = domain / aspectRatio
    xCenter = xClick - ((x / windowWidth) * domain) + (domain / 2)
    yCenter = yClick - ((y / windowHeight) * range) + (range / 2)

    --  update the fractal in the offscreen buffer
    drawFractal(fractalCanvasWidth, fractalCanvasHeight, fractalCanvas)
end
To avoid re-drawing the factal every frame, the fractal is rendered into an offscreen buffer and only updated when the user modifies the display in any way (zooming in, panning, changing color pallette). The drawFractal() function does the drawing into the offscreen buffer.
function drawFractal(width, height, drawCanvas, sendSize)

    --  send all of the information to the shader
    print(width, height, xCenter, yCenter, domain)
    print(drawCanvas)
    print(fractalCanvas)
    shader:send("window_width", width)
    shader:send("window_height", height)
    shader:send("x_center", xCenter)
    shader:send("y_center", yCenter)
    shader:send("domain", domain)

    --  draw the fractal to the drawCanvas using the shader by filling the
    --  canvas with a filled rectangle
    love.graphics.setCanvas(drawCanvas)
    love.graphics.setShader(shader)
    love.graphics.rectangle("fill", 0, 0, width, height)
    love.graphics.setShader()
    love.graphics.setCanvas()

end
This keeps the love.draw() method short and sweet. If the fractal canvas was oversized to accomplish the oversampling, the love.graphics.draw() method downsizes the buffer while drawing it to the screen.
function love.draw(dt)

    --  draw the fractal canvas, rescaling it to the window's size
    love.graphics.draw(fractalCanvas, 0, 0, 0, 1 / oversample)

    --  print the current zoom speed to the screen
    if displayZoomSpeed then
        local x = 5
        local y = windowHeight - 18
        love.graphics.print("zoom speed : " .. zoomSpeed, x, y, 0, 0.8)
    end

end
Here are some images and a video of the little program. Much prettier (and faster) than my previous attempt with OpenCL.

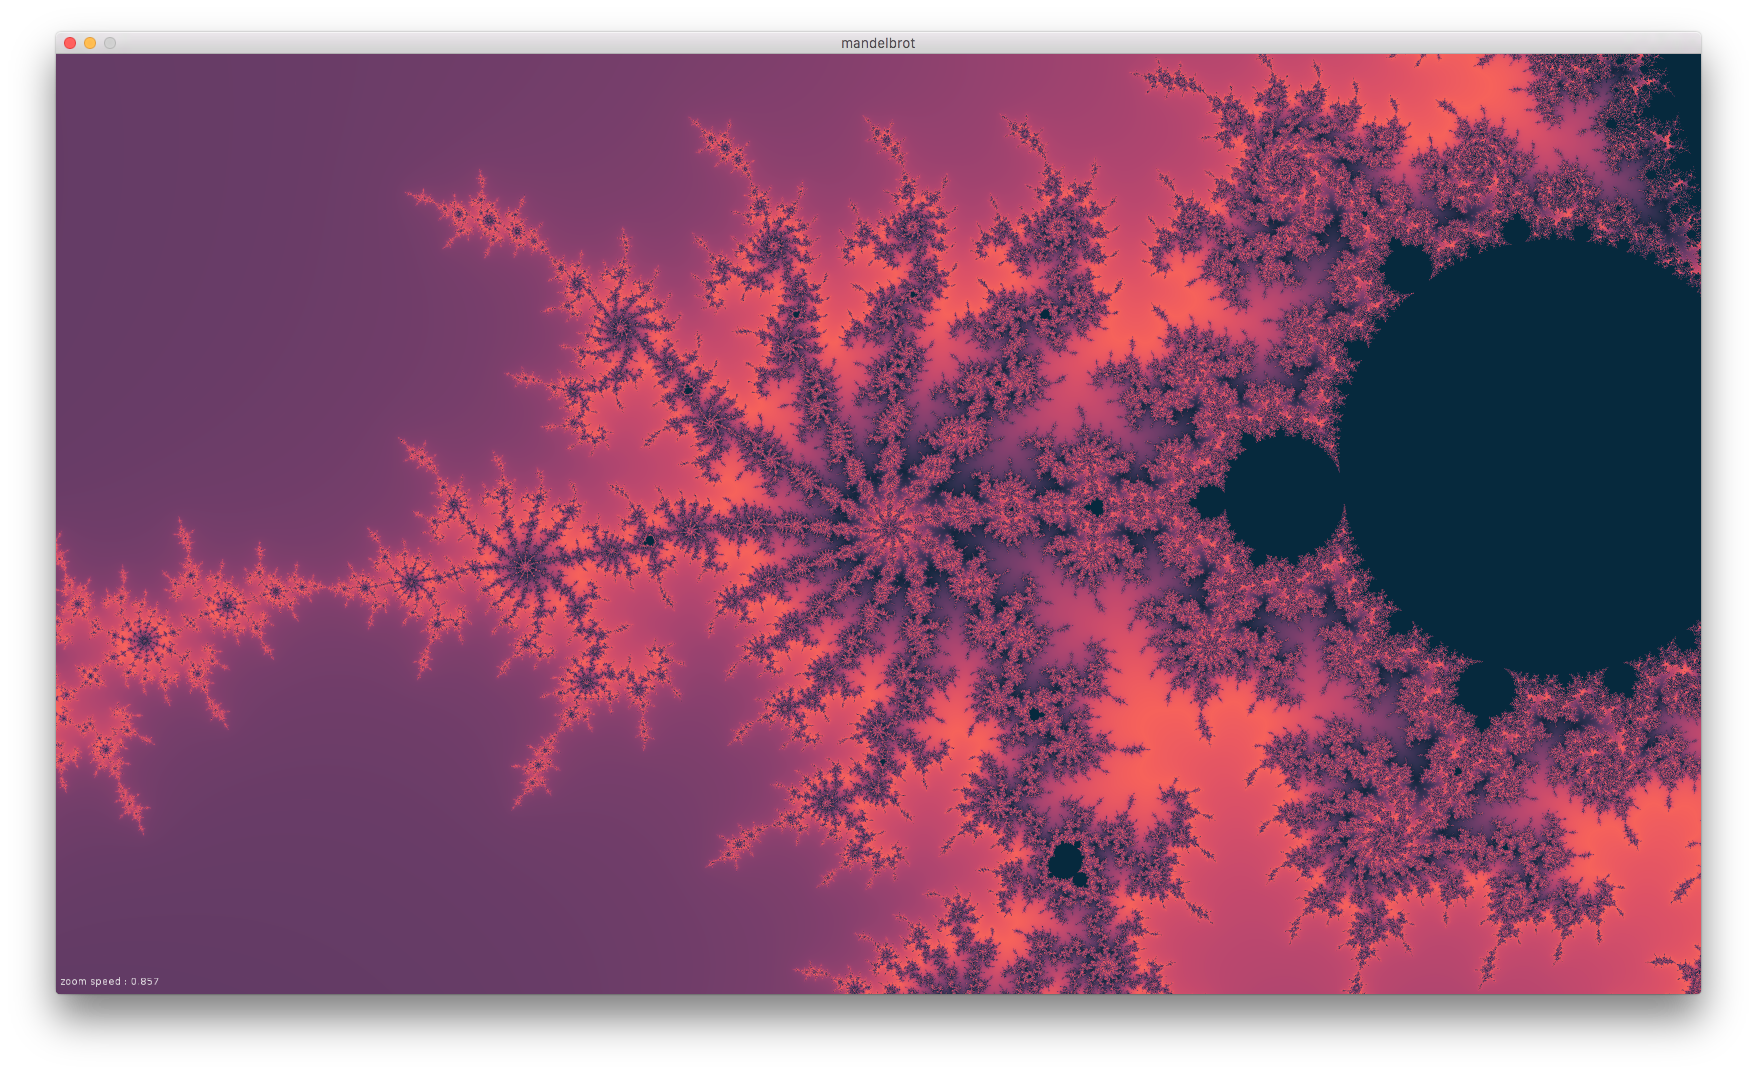
The limitation now is the finite precicion of the floating point math done inside the shader. I can't think of an easy workaround, my first idea would be to do arbitrary precision floating point math in software, somehow in an OpenGL shader. This might be a brute-force solution though, there might be more mathematical way around it.
As always, the full code listing is on github. I also made a post on the Löve2D forums here. The members there help fix some of the shader code to make it more platform independent. I also got it running on my iPhone, which is neat.